Churchill Barriers
Topic: Engineering
 From HandWiki - Reading time: 9 min
| Location |
| <graph>
{ // // ATTENTION: This code is maintained at https://www.mediawiki.org/wiki/Template:Graph:Street_map_with_marks // Please do not modify it anywhere else, as it may get copied and override your changes. // Suggestions can be made at https://www.mediawiki.org/wiki/Template_talk:Graph:Street_map_with_marks // // Template translation is in https://commons.wikimedia.org/wiki/Data:Original/Template:Graphs.tab // "version": 2, "width":275, "height": 580, "padding": 0, "signals":[ // These signals allow us to quickly move the map within the image, e.g. to leave space for the legend {"name":"legendWidth", "init": {"expr": "0"} }, {"name":"legendHeight", "init": {"expr": "height"} },
{"name":"imgWidth", "init": {"expr": "width-legendWidth"} },
{"name":"imgHeight", "init": {"expr": "height"} },
{"name":"imgXC", "init": {"expr": "imgWidth/2"} },
{"name":"imgYC", "init": {"expr": "imgHeight/2"} },
{"name":"imgTileSize", "init": {"expr": "256"} },
{"name":"imgLat", "init": {"expr": "58.8619"} },
{"name":"imgLon", "init": {"expr": "-2.9103"} },
{"name":"imgZoom", "init": {"expr": "12"} },
{"name":"picWidth", "init": {"expr": "180"} },
{"name":"picHeight", "init": {"expr": "picWidth/2"} },
{"name":"picXC", "init": {"expr": "imgWidth-(picWidth/2)"} },
{"name":"picYC", "init": {"expr": "imgHeight-(picHeight/2)"} },
{"name":"showMiniMap", "init": {"expr": "0"} }
],
"data": [
{
"name": "data",
// Otherwise use the first unnamed argument for source values "values": [ { "lat": 58.8619,
"lon": -2.9103,
"img": "wikirawupload:https://handwiki.org/wiki/images/thumb/1/10/Mapscaleline.svg/120px-Mapscaleline.svg.png",
"width": 50,
"height": 8,
"offsetX": -8.5,
"offsetY": 280,
"textAlign": "right",
"textDx": 22,
"textDy": -2,
"textColor": "grey",
"textFont": "Tahoma",
"textFontSize": 9,
"text": "2km" }
, { "lat": 0, "lon": 0, "img": "wikirawupload:https://handwiki.org/wiki/images/thumb/0/0c/Red_pog.svg/10px-Red_pog.svg.png", "height": 10, "width": 10, "text": "", "textAngle": 0, "textAlign": "right", "textBaseline": "middle", "textDx": -7, "textDy": 1, "textFontSize": 12, "textColor": "#AA1205"
}
, { "lat": 58.8929, "lon": -2.8963, "img": "wikirawupload:https://handwiki.org/wiki/images/thumb/0/0c/Red_pog.svg/7px-Red_pog.svg.png", "height": 7, "width": 7, "text": "Barrier No. 1", "textAngle": 0, "textAlign": "right", "textBaseline": "middle", "textDx": -5, "textDy": 1, "textFontSize": 12, "textColor": "#AA1205"
} , { "lat": 58.882, "lon": -2.9028, "img": "wikirawupload:https://handwiki.org/wiki/images/thumb/0/0c/Red_pog.svg/7px-Red_pog.svg.png", "height": 7, "width": 7, "text": "Barrier No. 2", "textAngle": 0, "textAlign": "right", "textBaseline": "middle", "textDx": -5, "textDy": 1, "textFontSize": 12, "textColor": "#AA1205"
} , { "lat": 58.8710, "lon": -2.9144, "img": "wikirawupload:https://handwiki.org/wiki/images/thumb/0/0c/Red_pog.svg/7px-Red_pog.svg.png", "height": 7, "width": 7, "text": "Barrier No. 3", "textAngle": 0, "textAlign": "right", "textBaseline": "middle", "textDx": -5, "textDy": 1, "textFontSize": 12, "textColor": "#AA1205"
} , { "lat": 58.8411, "lon": -2.9047, "img": "wikirawupload:https://handwiki.org/wiki/images/thumb/0/0c/Red_pog.svg/7px-Red_pog.svg.png", "height": 7, "width": 7, "text": "Barrier No. 4", "textAngle": 0, "textAlign": "right", "textBaseline": "middle", "textDx": -5, "textDy": 1, "textFontSize": 12, "textColor": "#AA1205"
} , { "lat": 58.9079, "lon": -2.9099, "size": "0", "text": "ORKNEY ^MAINLAND", "textAngle": 0, "textAlign": "right", "textBaseline": "middle", "textDx": 0, "textDy": 1, "textFontSize": 12, "textColor": "#AA1205"
} , { "lat": 58.8874, "lon": -2.8930, "size": "0", "text": "LAMB HOLM", "textAngle": 0, "textAlign": "right", "textBaseline": "middle", "textDx": 0, "textDy": 1, "textFontSize": 12, "textColor": "#AA1205"
} , { "lat": 58.8762, "lon": -2.9155, "size": "0", "text": "GLIMPS HOLM", "textAngle": 0, "textAlign": "right", "textBaseline": "middle", "textDx": 0, "textDy": 1, "textFontSize": 12, "textColor": "#AA1205"
} , { "lat": 58.8513, "lon": -2.9074, "size": "0", "text": "BURRAY", "textAngle": 0, "textAlign": "right", "textBaseline": "middle", "textDx": 0, "textDy": 1, "textFontSize": 12, "textColor": "#AA1205"
} , { "lat": 58.8239, "lon": -2.9289, "size": "0", "text": "SOUTH ^RONALDSAY", "textAngle": 0, "textAlign": "right", "textBaseline": "middle", "textDx": 0, "textDy": 1, "textFontSize": 12, "textColor": "#AA1205"
} , { "lat": 58.8807, "lon": -2.866, "size": "0", "text": "Holm ^Sound", "textAngle": 0, "textAlign": "right", "textBaseline": "middle", "textDx": -2, "textDy": 1, "textFontSize": 12, "textColor": "#0000FF"
} , { "lat": 58.8387, "lon": -2.888, "size": "0", "text": "Water ^Sound Bay", "textAngle": 0, "textAlign": "right", "textBaseline": "middle", "textDx": 0, "textDy": 1, "textFontSize": 10, "textColor": "#0000FF"
}
     ],
     "transform": [
       {
         "type": "geo",
         "projection": "mercator",
         "scale": {"expr": "imgTileSize/PI/2*pow(2,imgZoom)"},
         "translate": [{"expr": "imgXC"}, {"expr": "imgYC"}],
         "center": [{"expr": "imgLon"}, {"expr": "imgLat"}],
         "lon": "lon", "lat": "lat"
       },
       { "type": "formula", "field":"layout_x", "expr": "datum.layout_x + (datum.offsetX || 0)" },
       { "type": "formula", "field":"layout_y", "expr": "datum.layout_y + (datum.offsetY || 0)" },
       { "type": "formula", "field":"color", "expr": "datum.color || '#c33'" },
       { "type": "formula", "field":"textColor", "expr": "datum.textColor || datum.color" },
       { "type": "formula", "field":"strokeColor", "expr": "datum.strokeColor || '#ffe7e6'" }
     ]
   },
   {
     // Hack: single value data source for drawing/hiding images and other non-series elements
     "name": "dummyData",
     "values": [{}]
   }
 ],
// Legend only works if showLegend and colorScaleField are set "marks": [
{
"type": "image",
"from": {
"data": "dummyData",
"transform": [
{ "type": "formula", "field":"url", "expr": "'mapsnapshot:///?width='+imgWidth+'&height='+imgHeight+'&zoom='+imgZoom+'&lat='+imgLat+'&lon='+imgLon" }
]
},
"properties": {
"enter": {
"url": {"field": "url"},
"xc": {"signal": "imgXC"}, "yc": {"signal": "imgYC"},
"width": {"signal": "imgWidth"}, "height": {"signal": "imgHeight"}
}
}
},
{
// Places an image of a given name and size at the [lan,lon] location
"type": "image",
"from": {
"data": "data",
"transform": [
{ "type": "filter", "test": "datum.img" },
{ "type": "formula", "field":"iconWidth", "expr": "datum.width || 0" },
{ "type": "formula", "field":"iconHeight", "expr": "datum.height || 0" },
{ "type": "formula", "field":"img",
"expr": "if(!test(/^[a-z]+:\\/\\//, datum.img), 'wikifile:///'+datum.img, datum.img)" },
// Ensure that either width or height parameter is passed to wikifile:// request
{ "type": "formula", "field":"img",
"expr": "if((datum.iconWidth || datum.iconHeight) && !test(/[?&](width|height)=\\d/, datum.img),if(datum.iconWidth,datum.img+'?width='+datum.iconWidth,datum.img+'?height='+datum.iconHeight), datum.img)" }
]},
"properties": {
"enter": {
"url": {"field": "img"},
"xc": {"field": "layout_x"}, "yc": {"field": "layout_y"},
"width": {"field": "iconWidth"}, "height": {"field": "iconHeight"}
}
}
},
{
// Draw marks of a given color, shape, and size at the [lan,lon] location
"type": "symbol",
"from": {
"data": "data",
"transform": [{ "type": "filter", "test": "!datum.img" }]
},
"properties": {
"enter": {
"x": {"field": "layout_x"},
"y": {"field": "layout_y"},
// If colorScaleField is set, use color scaling, otherwise use the preset color value
"fill": { "field": "color" },
"size": {"field": "size"},
"shape": {"field": "shape"},
"stroke": {"field": "strokeColor"}
}
}
},
{
// Draw text with the given color and size at the [lan,lon] location
// See https://github.com/vega/vega/wiki/Marks#text for all parameter description (prepend "text" and capitalize them)
"type": "text",
"from": {
"data": "data",
"transform": [
{ "type": "filter", "test": "datum.text" },
// Figure out if this is an LTR or RTL page. For LTR, show label to the right of the icon, left-aligned. For RTL, reverse.
{ "type": "formula", "field":"isLTR", "expr": "'' == '\\u200E'" },
// If these values are not defined ("undefined" is not allowed, so test for truthiness and not 0)
{ "type": "formula", "field":"textDx", "expr": "if(!datum.textDx && datum.textDx != 0, if(datum.isLTR,8,-8), datum.textDx)" },
{ "type": "formula", "field":"textAlign", "expr": "if(!datum.textAlign, if(datum.isLTR,'left','right'), datum.textAlign)" },
{ "type": "formula", "field":"textBaseline", "expr": "datum.textBaseline || 'middle'" }
]},
"properties": {
"enter": {
"text": {"field": "text"},
"x": {"field": "layout_x" },
"y": {"field": "layout_y"},
"dx": {"field": "textDx" },
"dy": {"field": "textDy"},
"fill": {"field": "textColor"},
"align": {"field": "textAlign"},
"baseline": {"field": "textBaseline"},
"radius": {"field": "textRadius"},
"theta": {"field": "textTheta"},
"angle": {"field": "textAngle"},
"font": {"field": "textFont"},
"fontSize": {"field": "textFontSize"},
"fontWeight": {"field": "textFontWeight"},
"fontStyle": {"field": "textFontStyle"}
}
}
},
{
// Draw a low-zoom locator map frame
"type": "rect",
"from": {
"data": "dummyData",
"transform": [
{ "type": "filter", "test": "showMiniMap" }
]
},
"properties": {
"enter": {
"xc": {"signal": "picXC"}, "yc": {"signal": "picYC"},
"width": {"signal": "picWidth", "offset":2}, "height": {"signal": "picHeight"},
"stroke": {"value":"#fff"},"strokeWidth": {"value":6}
}
}
},
{
// Draw a low-zoom locator map by using a premade world map image
"type": "image",
"from": {
"data": "dummyData",
"transform": [
{ "type": "filter", "test": "showMiniMap" },
{ "type": "formula", "field":"url", "expr": "1" }
]
},
"properties": {
"enter": {
"url": {"value": "wikirawupload:https://handwiki.org/wiki/images/thumb/a/ac/Earthmap1000x500.jpg/180px-Earthmap1000x500.jpg"},
"xc": {"signal": "picXC"}, "yc": {"signal": "picYC"},
"width": {"signal": "picWidth"}, "height": {"signal": "picHeight"}
}
}
},
{
// Draw a zoom-out mark at the [lan,lon] location
"type": "symbol",
"from": {
"data": "dummyData",
"transform": [
{ "type": "filter", "test": "showMiniMap" },
{ "type": "formula", "field":"lat", "expr": "imgLat" },
{ "type": "formula", "field":"lon", "expr": "imgLon" },
{
"type": "geo",
"projection": "equirectangular",
"scale": {"expr": "180/2/PI"},
"translate": [{"expr": "picXC"}, {"expr": "picYC"}],
"center": [{"expr": "0"}, {"expr": "0"}],
"lon": "lon", "lat": "lat"
}
]
},
"properties": {
"enter": {
"x": {"field": "layout_x"}, "y": {"field": "layout_y"},
"fill": {"value": "#c33"},
"stroke": {"value": "#ffe7e6"},
"size": {"value": 40}
}
}
}
]
} </graph> <maplink zoom="12" latitude="58.8619" longitude="-2.9103" text="[Interactive fullscreen map]">
[
"features": [
  "properties": {
   "title": "Barrier No. 1",
   "description": " 58.8929,-2.8963",
   "marker-symbol": "-number", "marker-size": "medium", "marker-color": "#AA1205" },
  "geometry": {"type": "Point", "coordinates": [-2.8963,58.8929] }
}
, { "type": "Feature", "properties": {
"title": "Barrier No. 2",
"description": " 58.882,-2.9028",
"marker-symbol": "-number", "marker-size": "medium", "marker-color": "#AA1205" },
"geometry": {"type": "Point", "coordinates": [-2.9028,58.882] }
}
, { "type": "Feature", "properties": {
"title": "Barrier No. 3",
"description": " 58.8710,-2.9144",
"marker-symbol": "-number", "marker-size": "medium", "marker-color": "#AA1205" },
"geometry": {"type": "Point", "coordinates": [-2.9144,58.8710] }
}
, { "type": "Feature", "properties": {
"title": "Barrier No. 4",
"description": " 58.8411,-2.9047",
"marker-symbol": "-number", "marker-size": "medium", "marker-color": "#AA1205" },
"geometry": {"type": "Point", "coordinates": [-2.9047,58.8411] }
}
, { "type": "Feature", "properties": {
"title": "Mainland, Orkney",
"description": " 58.9079,-2.9099",
"marker-symbol": "-number", "marker-size": "medium", "marker-color": "#AA1205" },
"geometry": {"type": "Point", "coordinates": [-2.9099,58.9079] }
}
, { "type": "Feature", "properties": {
"title": "Lamb Holm",
"description": " 58.8874,-2.8930",
"marker-symbol": "-number", "marker-size": "medium", "marker-color": "#AA1205" },
"geometry": {"type": "Point", "coordinates": [-2.8930,58.8874] }
}
, { "type": "Feature", "properties": {
"title": "Glimps Holm",
"description": " 58.8762,-2.9155",
"marker-symbol": "-number", "marker-size": "medium", "marker-color": "#AA1205" },
"geometry": {"type": "Point", "coordinates": [-2.9155,58.8762] }
}
, { "type": "Feature", "properties": {
"title": "Burray",
"description": " 58.8513,-2.9074",
"marker-symbol": "-number", "marker-size": "medium", "marker-color": "#AA1205" },
"geometry": {"type": "Point", "coordinates": [-2.9074,58.8513] }
}
, { "type": "Feature", "properties": {
"title": "South Ronaldsay",
"description": " 58.8239,-2.9289",
"marker-symbol": "-number", "marker-size": "medium", "marker-color": "#AA1205" },
"geometry": {"type": "Point", "coordinates": [-2.9289,58.8239] }
}
|
The Churchill Barriers are four causeways in the Orkney islands[1] with a total length of 2.3 kilometres (1.4 mi). They link the Orkney Mainland in the north to the island of South Ronaldsay via Burray[2] and the two smaller islands of Lamb Holm and Glimps Holm.
The barriers were built between May 1940 and September 1944, primarily as naval defences to protect the anchorage at Scapa Flow, but since 12 May 1945 they serve as road links between the islands.[3] The two southern barriers, Glimps Holm to Burray and Burray to South Ronaldsay, are Category A listed.[1][4][5]
History

On 14 October 1939, the Royal Navy battleship HMS Royal Oak was sunk at her moorings within the natural harbour of Scapa Flow,[6] by the Engineering:German submarine U-47 under the command of Günther Prien. U-47 had entered Scapa Flow through Holm Sound, one of several eastern entrances to Scapa Flow.
The eastern passages were protected by measures including sunken block ships, booms and anti-submarine nets, but U-47 entered at night at high tide by navigating between the block ships.
To prevent further attacks, First Lord of the Admiralty Winston Churchill ordered the construction of permanent barriers.[2] Work began in May 1940 and the barriers were completed in September 1944 but were not officially opened until 12 May 1945,[7] four days after Victory in Europe Day.
Construction
The contract for building the barriers was awarded to Balfour Beatty, although part of the southernmost barrier (between Burray and South Ronaldsay) was sub-contracted to William Tawse & Co. The first Resident Superintending Civil Engineer was E K Adamson, succeeded in 1942 by G Gordon Nicol.
Preparatory work on the site began in May 1940, while experiments on models for the design were undertaken at Whitworth Engineering Laboratories at the University of Manchester.
The bases of the barriers were built from gabions enclosing 250,000 tonnes of broken rock, from quarries on Orkney. The gabions were dropped into place from overhead cableways into waters up to 18 metres (59 ft) deep. The bases were then covered with 66,000 locally cast concrete blocks in five-tonne and ten-tonne sizes. The five-tonne blocks were laid on the core, and the ten-tonne blocks were arranged on the sides in a random pattern to act as wave-breaks.
Labour
A project of this size required a substantial labour force, which peaked in 1943 at over 2,000.[8]
Much of the labour was provided by over 1,300 Italian prisoners of war[2] who had been captured in the desert war in North Africa; they were transported to Orkney from early 1942 onwards.
The prisoners were accommodated in three camps, 600 at Camp 60 on Little Holm and the remaining 700 at two camps on Burray.[9]
In 1943, those at Camp 60 built an ornate Italian Chapel, which still survives and has become a tourist attraction.[9]
Ecological impact
Research by the University of York published in 2012 showed significant changes to the ecology of the area, and that behind the barriers an eutrophic environment dominated due to the loss of the natural throughflow of water.[10]
The eastern side of Barrier No 4 has become engulfed in sand. The resulting bay, known as Water Sound Bay, has formed a crescent shaped sandy beach backing onto a substantial dune system separating the barrier from the sea. Marram grass, (Ammophila arenaria) and Lyme grass with oyster leaf and frosted orache have all successfully colonised and stabilised the dunes. Northerly movement of longshore drift appears to be responsible for the build up of the sand, which has been apparent since at least 1961,[11] and has completely buried the remains of the steamship Carron, which was sunk as a blockship in 1940.[12]
Deterioration
In October 2011, the Orkney Islands Council took control of the barriers from the Ministry of Defence.[6] Since then, with increasingly erratic weather events and rising sea levels as a result of global climate change, the barriers have begun to deteriorate.[13] Of the four barriers, only Barrier No. 2, from Lamb Holm to Glimps Holm, is at high risk for needing to be replaced, according to the Scottish Environment Protection Agency.[13][14][15] Replacing even one of the causeways is extremely unpopular in Orkney due to their historical significance. The council was as of February 2021 exploring options that would preserve all of the causeways.[13]
Gallery
-
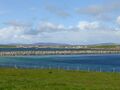 Barrier 1, linking Mainland and Lamb Holm. It was through this channel U-47 entered Scapa Flow to attack HMS Royal Oak in 1939.
 -
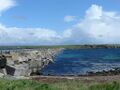 Barrier 2, linking Lamb Holm and Glimps Holm
 -
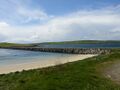 Barrier 3, linking Glimps Holm and Burray.
 -
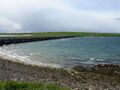 Barrier 4, linking Burray and South Ronaldsay.


See also
References
- ↑ 1.0 1.1 "Orkney's 'Churchill Barriers' listed by Historic Environment Scotland" (in en-GB). BBC News. 24 November 2016. https://www.bbc.com/news/uk-scotland-north-east-orkney-shetland-38096860.
- ↑ 2.0 2.1 2.2 "Race to save Churchill Barriers amid climate change threat to World War II causeways" (in en). 14 February 2021. https://www.scotsman.com/news/environment/race-save-churchill-barriers-amid-climate-change-warning-3133642.
- ↑ Reardon, Terry (13 March 2016). "Scapa Flow: The Churchill Barriers" (in en-US). p. 22. https://winstonchurchill.org/publications/finest-hour/finest-hour-171/scapa-flow-the-churchill-barriers/.
- ↑ Historic Environment Scotland. "Churchill Barrier No 3, Glimps Holm to Burray... (LB52392)". http://portal.historicenvironment.scot/designation/LB52392.
- ↑ Historic Environment Scotland. "Churchill Barrier No 4, Burray to South Ronaldsay... (LB52417)". http://portal.historicenvironment.scot/designation/LB52417.
- ↑ 6.0 6.1 "Orkney energy hopes follow Churchill Barrier sale" (in en-GB). BBC News. 31 October 2011. https://www.bbc.com/news/uk-scotland-north-east-orkney-shetland-15518158.
- ↑ "75th anniversary of the official opening of the Churchill Barriers" (in en-GB). 12 May 2020. https://www.orcadian.co.uk/75th-anniversary-of-the-official-opening-of-the-churchill-barriers/.
- ↑ Fraser, Gemma. "Churchill Barriers to have new role taming the tide" (in en). The Times. ISSN 0140-0460. https://www.thetimes.com/uk/scotland/article/churchill-barriers-to-have-new-role-taming-the-tide-5cf9kppfz.
- ↑ 9.0 9.1 "The legacy of the Italian Chapel" (in en-GB). 23 November 2009. https://news.bbc.co.uk/local/northeastscotlandnorthernisles/hi/people_and_places/religion_and_ethics/newsid_8374000/8374409.stm.
- ↑ Selby, Katherine Anne; Langdon, P. G. (June 2012). "The Impacts of The Churchill Barriers on the Coastal Environment" (in en). Scottish Geographical Journal (University of York) 128 (2): 100–118. doi:10.1080/14702541.2012.716606. Bibcode: 2012ScGJ..128..100S. https://pure.york.ac.uk/portal/en/publications/the-impacts-of-the-churchill-barriers-on-the-coastal-environment(2c0e906f-deab-4cea-bda9-0446bbb7e940).html. Retrieved 14 April 2022.
- ↑ Hall, Adrian. "Churchill Barrier No. 4". https://orkneylandscapes.org/orkney/churchill-barrier-no-4/.
- ↑ Crawford, Ian; Moir, Peter. "The Blockships". https://www.scottishshipwrecks.com/the-blockships/.
- ↑ 13.0 13.1 13.2 McLaughlin, Martyn (14 February 2021). "Race to save Churchill Barriers amid climate change threat to World War II causeways" (in en). https://www.scotsman.com/news/environment/race-save-churchill-barriers-amid-climate-change-warning-3133642.
- ↑ Scotland, Tammar (14 February 2021). "Urgent plea to save Churchill Barriers from climate change" (in en). https://www.heraldscotland.com/news/19089289.churchill-barriers-face-urgent-climate-change-warning/.
- ↑ Historic Environment Scotland. "Churchill Barrier No. 2, Lamb Holm To Glimps Holm (Category PLA) (112585)". http://portal.historicenvironment.scot/designation/112585.
External links
- Burray and The Barriers
- Undiscovered Scotland: The Churchill Barriers
- Our Past History: The Churchill Barriers
- Okneypics.com: photos of the barrier
 |  |
 EncycloReader
is supported by the
EncycloReader
is supported by the