Machinist square
Topic: Engineering
 From HandWiki - Reading time: 3 min

A machinist square or engineer's square is the metalworkers' equivalent of a try square. It consists of a steel blade inserted and either welded or pinned into a heavier body at an angle of 90°. Usually a small notch is present at the inside corner of the square. This prevents small particles from accumulating at the juncture and affecting the square's reading.
Use
In use, the body is aligned against the one edge of the object and the blade is presented to the end or body of the object. If the end is being checked, then a strong light source behind the square will show any mismatch between the blade of the square and the end of the object. The purpose of this action is to check for squareness or to mark out the body of the workpiece.
Accuracy

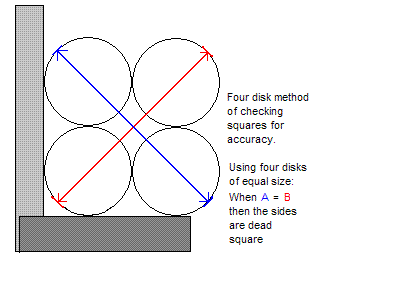
Machinist squares can have a linear error of no greater than 0.0002 mm/mm.[1] Squares must be occasionally checked for accuracy. The four disk method is one way to verify overall squareness. However, it cannot detect bent blades.
Accuracy grades and standards
There are several different International or National standards that Engineer's Squares are manufactured to, two main ones being: - BS 939. (British Standards). - DIN 875-1 (German/Euro standards).
Under both these standards there are basic dimensions set out for blade/body length ratio, and cross sections of both, as well as different types of squares such as those with a solid body and an inserted blade, or those with a single piece blade and body being precision ground with another plate attached to the base of this to provide a square 'butt' to refer to.
Also under these standards there are different grades of accuracy to which a square can be made. It usually relates to a deviation of 'X' amount of blade lean vs. height of measurement usually done at the top of the blade. This also assumes that the blade and body widths are both perfectly parallel, making for a true reading along the blade length and inside and outside the square.
Typically there are A or B grade squares made and sold, B grade being perfectly serviceable for most general use where accuracy is required in a workshop situation. A grade squares are typically used in applications where a higher grade of accuracy is required, in a toolroom for example, or for checking other squares for square, or for making jigs and fixtures where high levels of accuracy are needed.
Accuracy checking and calibration

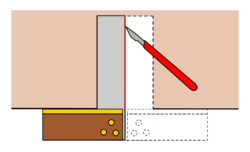
The simplest method of checking a low grade square for accuracy is to draw a line across a board with a flat face and straight edge (illustrated). Then flip the square over 180 degrees and check if the blade aligns with the line just drawn. Any error is multiplied by two and appears as a wedge or taper.
The ultimate method of mechanically calibrating a try square or similar is with a cylindrical master square sitting on a granite or cast iron surface plate that is flat. By nature of their construction a cylindrical master square cannot help but sit at a perfect 90 degree angle to the flat surface. A square to be tested can be presented to the master and feeler gauges used with a source of light behind the gap to get a reading of deviation. If done cleanly and correctly, this method can find errors down to 0,01 mm, which is the limit of practical accuracy since thermal expansion from contact with the fingers will distort the blade by approximately that much.[citation needed]
Other methods of calibration utilise modern technology by using a CMM (Coordinate Measuring Machine) for example, or a vertical machining center fitted with a dial indicator.
References
- ↑ Horner, Ken (2007), Essential Guide to the Steel Square: Facts, Short-Cuts, and Problem-Solving Secrets for Carpenters, Woodworkers & Builders, Fox Chapel Publishing, p. 31, ISBN 978-1-56523-342-3, https://books.google.com/books?id=_k5SxcKRxqQC&lpg=PA31.
 |
 KSF
KSF