Peening
Topic: Engineering
 From HandWiki - Reading time: 6 min
In metallurgy, peening is the process of working a metal's surface to improve its material properties, usually by mechanical means, such as hammer blows, by blasting with shot (shot peening), focusing light (laser peening), or in recent years, with water column impacts (water jet peening) and cavitation jets (cavitation peening).[1] With the notable exception of laser peening, peening is normally a cold work process tending to expand the surface of the cold metal, thus inducing compressive stresses or relieving tensile stresses already present. It can also encourage strain hardening of the surface metal.
Residual stress
Plastic deformation from peening induces a residual compressive stress in a peened surface, along with tensile stress in the interior. This stress state resembles the one seen in toughened glass, and is useful for similar reasons.
Surface compressive stresses confer resistance to metal fatigue and to some forms of corrosion, since cracks will not grow in a compressive environment. The benefit comes at the expense of higher tensile stresses deeper in the part. However, the fatigue properties of the part will be improved, since the stresses are normally significantly higher at the surface in part due to surface imperfections and damage.
Work hardening
Cold working also serves to harden the material's surface. This makes cracks less likely to form at the surface and provides resistance to abrasion. When a metal undergoes strain hardening its yield strength increases but its ductility decreases. Strain hardening actually increases the number of dislocations in the crystal lattice of the material. When a material has a great number of dislocations, plastic deformation is hindered, and the material will continue to behave in an elastic way well beyond the elastic yield stress of the non-strain hardened material.
Residual strain / stretching
Plastic deformation from peening can be useful in stretching the surface of an object.
One common use of this peening (stretching) process can be seen in the auto repair and auto custom fabrication industries where manual or machine assisted peening is used to stretch thin sheet metal to create curved surfaces. The manual method uses a hand held peening hammer and is a form of planishing. There are also machine assisted methods that use a version of a power hammer to peen the sheet metal.
Another use of the peening process is to flatten sheet metal and is specifically used as a primary technique to flatten steel belts used in industrial conveying and pressing operations. In this process a steel belt that has a cross curvature can be flattened by peening the concave surface to stretch it and thereby removing the cross-curvature by equalizing the surface length across the belt between the previously concave and convex surfaces. The shot peening of steel belts is usually achieved by using specialized equipment and special peening shot.
When peening is used to induce residual stress or work-harden an object, care needs to be taken with thin parts not to stretch the work-piece. Where stretching is unavoidable then allowances may need to be made in the part design or process application.
Use with welding
Hand peening may also be performed after welding to help relieve the tensile stresses that develop on cooling in the welded metal (as well as the surrounding base metal). The level of reduction in tensile stress is minimal and only occurs on or near to the weld surface. Other methods, like heat spots (if applicable), help reduce residual tensile stresses. Peening will induce a higher hardness into the weld and this is something that should be avoided. For this reason, peening is not normally accepted by the majority of codes, standards or specifications.[2] Any peening that is carried out on a weld should have been carried out on the weld procedure qualification test piece.
The welding procedure qualification test piece replicates all of the essential variables that will be used in production welding. If the weld is peened during the qualification of a welding procedure, the subsequent mechanical testing of the procedure qualification test piece will demonstrate the mechanical properties of the weld. These mechanical properties must, as a minimum, match the mechanical properties of the materials that have been welded together. If they do not, the procedure has failed and the welding procedure is not acceptable for use in production welding.
Sharpening blades

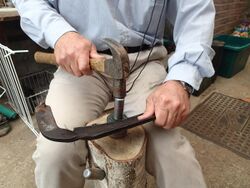
Scythe and sickle blades have traditionally been sharpened by occasional peening followed by frequent honing in the field during use. A blade can be sharpened by reforming the malleable steel to create an edge profile that can then be honed. Nicks and cuts to the blade edge can be worked out of the blade by peening and a new edge profile then formed for honing.

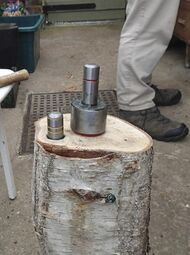
Blades can be free-peened using various designs of peening anvils, or worked on a peening jig. A peening jig may have interchangeable caps that set different angles: a coarse angle can be set first about 3 millimetres (0.12 in) back from the edge, and a fine angle is then set on the edge, leaving an edge that lends itself to being easily honed. The blade can then be honed using progressively finer honing stones until it is ready for use.[3][4]
Etymology
The term peening is said to have derived from the Old Swedish term pæna, to beat thin with a hammer.[5]
History
The use of peening to improve the material properties of metals goes back to ancient times.[6] Gold was hammered to mechanically enhance helmets as far back as 2700 BC[7] and bronze was hammered to strengthen armor in Ancient Greece.[8][9] In the Middle Ages, hammering was used to strengthen and shape swords. Later applications to improve metal strength include the hammering of artillery gun barrels in the 18th century.[7] Likewise, blacksmiths typically used a ball peen hammer to shape and improve the life of carriage springs.[8]
First scientific investigations of the properties of metals were carried out in the 19th century, notably in the context of fatigue failures in railway development and the industrial revolution. Wöhler, e.g. carried out extensive work on the fatigue strength of metals subjected to cycles of stress.[10] Kirkaldy conducted experiments on the tensile strength of wrought-iron and steel and Bauschinger tested the elastic limits of iron and steel during stretching and compression.[11]
It was only in the early 20th century that surface treatments of metals began to develop into technical processing methods, with shot peening — effectively a myriad of small hammer blows[8] — coming into focus as an alternative to rolling for increasing fatigue strength.[7] In 1927, E.G. Herbert described the hardening effect of the “cloudburst” process, during which a stream of small steel balls “rained” onto a steel surface while O Föppl demonstrated the beneficial effect of cold working to increase fatigue resistance in 1929.[6]
The first patent for shot peening was taken out in Germany in 1934 but was never commercially implemented. Independently in 1930, a few engineers at Buick noticed that shot blasting (as it was originally termed) made springs resistant to fatigue. This process was then adopted by the automotive industry. Zimmerli first published a report in 1940. John Almen did more research, and during World War 2 introduced it to the aircraft industry.[12]
By 1950, shot peening became an accepted process and was being included in engineering literature. In the same year, shot peen forming was invented to form the wing skin of the Super Constellation aircraft.[12]
A significant innovation in hammer peening technology in the early 1970s was Efim Statnikov’s development of ultrasonic impact treatment (UIT),[13] which uses guided rod-shaped indenters to transmit high-frequency impulses to the treated surface.[14]
In the early 1970s, peening experienced a further major innovation when researchers such as Allan Clauer at Battelle labs in Columbus, Ohio applied high-intensity laser beams onto metal components to achieve deep compressive residual stresses, which they patented as Laser Shock Peening, and became known as laser peening in the late 1990s, when it was first applied to gas-fired turbine engine fan blades for the U.S. Air Force.
See also
- Almen strip
- Ball-peen hammer
- Case hardening
- Heat treatment
- Peen plating
- High-frequency impact treatment
- Ultrasonic impact treatment
- Laser peening
References
- ↑ Soyama, Hitoshi (January 2020). "Cavitating Jet: A Review" (in en). Applied Sciences 10 (20): 7280. doi:10.3390/app10207280. ISSN 2076-3417.
- ↑ ASME B31.3 para 328.5.1 (d) (location changes when new codes are published)
- ↑ "Peening and Sharpening". 31 March 2014. https://scythecymru.co.uk/scythes-for-sale/peening/.
- ↑ "Learning to peen a scythe". 31 May 2016. https://stevetomlincrafts.wordpress.com/2016/05/31/learning-to-peen-a-scythe/.
- ↑ "Peen | Etymology of peen by etymonline". https://www.etymonline.com/word/peen.
- ↑ 6.0 6.1 Hawkinson, E.E. (1962). "Shot Peening - History". The Shot Peener. https://www.shotpeener.com/library/detail.php?anc=1962004&keyword=hawkinson.
- ↑ 7.0 7.1 7.2 Schulze, Volker (2006). "Introduction". Modern Mechanical Surface Treatment. Weinheim: Wiley-Vch Verlag. pp. 1–7. doi:10.1002/3527607811.ch1. ISBN 978-3-527-31371-6. https://onlinelibrary.wiley.com/doi/10.1002/3527607811.ch1.
- ↑ 8.0 8.1 8.2 Leghorn, George (1957). "The Story of Shot Peening". The Shot Peener. https://www.shotpeener.com/library/detail.php?anc=1957006&keyword=leghorn.
- ↑ "Breastplate Fragment with Inscription and Relief Decoration | Harvard Art Museums". https://harvardartmuseums.org/collections/object/311835.
- ↑ Zenner, Harald; Hinkelmann, Karsten (2019). "August Wöhler - founder of fatigue strength research". Steel Construction (Wiley) 12 (2): 156–162. doi:10.1002/stco.201900011. https://doi.org/10.1002/stco.201900011.
- ↑ Timoshenko, Stephen P. (1983). History of Strength of Materials: With A Brief Account of the History of Theory of Elasticity and Theory of Structures. Courier Corporation. ISBN 9780486611877. https://books.google.com/books?id=tkScQmyhsb8C.
- ↑ 12.0 12.1 Fuchs, H. O.; Cary, P. E., History of Shot Peening, First International Conference on Shot Peening, http://www.shotpeener.com/library/pdf/1981137.pdf.
- ↑ Chan, Wai Luen; Cheng, Hentry Kuo Feng Cheng (2022). "Hammer peening technology - the past, present, and future". International Journal of Advanced Manufacturing Technology 118 (3–4): 683–701. doi:10.1007/s00170-021-07993-5. https://www.researchgate.net/figure/Historical-development-timeline-of-hammer-peening-process_fig1_354488615.
- ↑ Statnikov, Efim Sh.; Korolkov, Oleg V.; Vityazev, Vladimir N. (2006). "Physics and mechanism of ultrasonic impact". Ultrasonics 44, Supplement: e533–e538. doi:10.1016/j.ultras.2006.05.119. PMID 16808946. https://www.sciencedirect.com/science/article/abs/pii/S0041624X06001557.
 |
 KSF
KSF