Swedish torch
Topic: Physics
 From HandWiki - Reading time: 4 min
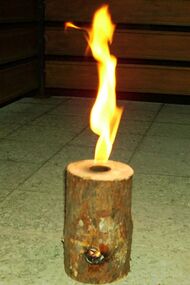
A Swedish torch (also Swedish candle, Finn candle, Finnish torch, Finnish candle, Swedish fire, Siberian tree torch or Russian tree torch; German: Schwedenfeuer) is a source of heat and light from a vertically set tree trunk, incised and burning in the middle. Despite its more common name "Swedish torch" it was invented by the Finns and it became known in Europe during the 1600s and is now used by forest workers, and for leisure activities (especially in southern Germany). Due to its flat surface and good embers, it can also be used for cooking. Compared to a campfire, it is more compact, and therefore several small heat sources can be distributed over an area. File:Making and using two types (sawed and drilled) Swedish torches in Kõrvemaa, Estonia (September 2022).webm
The origins of Swedish torch are not clear. According the forest museum Lusto Swedish torch was invented by Finns in the northern Finland. It was made by loggers to warm up and make wood. In 1950s when chainsaws became more popular it became common to make a carving to the halfway of the log and put it standing upwards. Another tradition attributes the development of the torch to the Swedish military during the Thirty Years' War; using a saw or hacksaw or an axe, the Swedes are said to have made burning and glowing logs to warm their soldiers.[1] This method of providing heat meant that their troops did not have to carry their own firewood with them but were able to get supplies on site, as the freshly cut, green wood can burn due to the chimney effect.
Manufacture and use
A delimbed trunk, of a diameter of 30 to 60 cm (12 to 24 in) and a length of 50 to 150 cm (20 to 60 in) is required to make the torch.[1] The wood should not be too dry, otherwise it would burn too quickly. The best types of wood for light and heat are resinous softwoods: spruce, fir and pine. The best types for cooking are hardwoods like beech, oak, apple, ash or cherry, as they are less sooty and would not taint the meat.[2]
A chainsaw is used to cut the trunk with two vertical cuts perpendicular to each other downwards while the trunk is standing. The cuts stop 6 to 8 cm (2 to 3 in) from the base so that the torch does not break apart. Normally, the trunk is divided into quarters by two cuts, or, in the case of larger trunks, in sixths (like a six-pointed asterisk) or eighths.[1] The cuts aid in air circulation, which helps the log burn.[1]
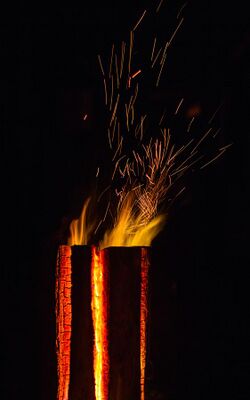
As the log burns, embers and coals fall from the top and into the cut slots. This ignites the log from within and keeps the fire going.[1] The log is easiest to ignite with paraffin (or lighter fluid), which is inserted into the side slots and also at the top at the saw cut point of the trunk. Rags soaked in oil are also suitable. Lumberjacks pour a little bit of their chainsaw fuel into the center of the torch. If a campfire is already burning, some embers placed on top of the log can make a Swedish torch.[1]
Choosing a safe place to set the torch is important due to flying sparks and possibility of it falling apart.[3] To ignite the trunk evenly, add some paraffin at the top. Depending on the size and length, the trunk burns between two and five hours and glows with intense heat. The glow in the middle of the trunk has a temperature between 1,000 and 1,200 °C (1,800 and 2,200 °F). After the torch has started burning, it is possible to place a pan on top. Before lighting, hammer three nails around the borehole or place three stones around the borehole, creating an improvised cooking surface.[4]
Other styles

Blast furnace style
Another design has a drill hole (approximately 20 mm or 0.8 in) along the axis of the trunk for the exhaust gases and a second hole radially at the desired level for the air supply. It is ignited by pouring a few embers or by loading it with an easily flammable material such as kerosene, fuel tablets, or fire starters. Some hardware stores sell "Russian tree torches" with candle wax and candle wick lighters.[5]
Survival skills version
Even without a drill, a tree torch can be quickly produced in the outdoors. To do this, use a saw to cut the log approximately two-thirds of the way up the log, and cut the base at the desired height 5 to 10 cm (2 to 4 in). As in the picture above (marked A or B), split off the sections on the blue line and remove the core on the red line. Saw in the ventilation hole, or lift the smaller section of variant B up for the ventilation distance. Finally put the three parts together and B, fix with wire, cord or nails.[6]
Gallery
See also
- Hobo stove as a fireplace using a tin can
References
- ↑ 1.0 1.1 1.2 1.3 1.4 1.5 Hutchison, Patrick (18 December 2018). "How to Make a Swedish Torch" (in en). https://www.artofmanliness.com/articles/how-to-make-a-swedish-torch.
- ↑ Weston, Nick (2012). "Swedish log candle". Backwoods Home Magazine (138). https://www.backwoodshome.com/swedish-log-candle.
- ↑ "How to: Make a Swedish Flame". 7 October 2016. https://www.manmadediy.com/2850-how-to-make-a-swedish-flame.
- ↑ Ladd, Kelly (2019-10-24). "How to Make a Swedish Fire Log" (in en). https://www.treehugger.com/how-make-swedish-fire-log-4863816.
- ↑ "Esschert Design Esschert Design Schwedenfeuer, Baumfackel, Größe M, ca. 50 cm hoch". https://www.amazon.de/Esschert-Design-Schwedenfeuer-Baumfackel-Gr%C3%B6%C3%9Fe/dp/B0052RW1XA.
- ↑ "How to Make a Swedish Fire Log". 2016-11-15. https://www.freshoffthegrid.com/swedish-fire-log.
External links
- "Finnische Fackel (Rundholzkerze)" (in de). https://www.sac-basel.ch/publikationen/Dateien/Fackeln_01.PDF.
- "Schweden-Feuer" (in de). http://www.kroetenloch.de/Schweden-Feuer/Schweden-Feuer.html.
 |
 KSF
KSF


